Showing posts with label Breads. Show all posts

Wednesday, January 21, 2009

Oh, Brioche


Brioche has been on my "hit list" of must bakes for awhile now. I've surprisingly only had brioche once (made into French toast...fabulous!) but it seems like something that is just a baking staple.

When looking for recipes, I stayed away from all of my bread books thinking they would give me the harder way to make this, they always do. And it does turn out that there are more streamlined ways to make brioche. I was happy to see that La Tartine Gourmande had a very down to earth, dare I say easy, brioche recipe. But for my first time, I wanted the full experience.

I found a recipe through Epicurious that seemed like the real mccoy. Let's see - beat in a lot of butter (check). Let is slow rise in the refrigerator overnight (check). Stir the dough once every 30 minutes for 2 hours while slow rising (check). There seemed to be enough hours of both work and waiting to make this recipe feel authentic enough for me.

The experience was awesome, if you can say that about making bread. This dough was one of the best I've ever worked with, probably because of the butter to flour ratio (my flab would rather not think about this). The dough was silky smooth and yet elastic at the time time. I loved it!

I loved the dough, until I baked it and was able to eat it.

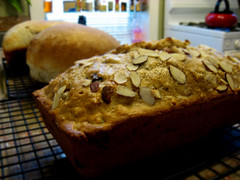
OH MY SWEET GOODNESS. Is it a croissant? Or a loaf of bread? This crazy hybrid butter-fest was so light on the tongue and yet so rich. It was worth every minute of prep, and all three sticks of butter (don't think I'm joking!). Maybe next time I'll go for an easier version if I'm in a time crunch, but the process to make this was too much fun.

Golden Brioche

1/3 cup warm water (105°F to 115°F)
1/3 cup warm milk (105°F to 115°F)
2 envelopes dry yeast
3 3/4 cups all purpose flour
2 teaspoons salt
3 large eggs
1/4 cup sugar
1 1/2 cups (3 sticks) unsalted butter, each stick cut into 4 pieces, room temperature
1 egg, beaten to blend with 1 tablespoon water (for glaze)

Place 1/3 cup warm water, warm milk, and yeast in bowl of standing heavy-duty mixer; stir until yeast dissolves. Fit mixer with dough hook. Add flour and salt to bowl; mix on low speed just until flour is moistened, about 10 seconds. Scrape sides and bottom of bowl.
Beat in 3 eggs on low speed, then add sugar. Increase speed to medium and beat until dough comes together, about 3 minutes. Reduce speed to low.
Add butter, 1 piece at a time, beating until each piece is almost incorporated before adding next (dough will be soft and batter-like). Increase speed to medium-high and beat until dough pulls away from sides of bowl, about 7 minutes.
Cover bowl with plastic wrap. Let dough rise at room temperature until almost doubled in volume, about 1 hour. Lift up dough around edges and allow dough to fall and deflate in bowl. Cover bowl with plastic and chill until dough stops rising, lifting up dough around edges and allowing dough to fall and deflate in bowl every 30 minutes, about 2 hours total. Cover bowl with plastic; chill dough overnight.
Butter and flour three 7 1/2x3 1/2x2-inch loaf pans. Divide dough into 3 equal pieces. Cut each dough piece into 4 equal pieces. Roll each into 3 1/2-inch-long log, forming 12 logs total. Arrange 4 logs crosswise in bottom of each prepared loaf pan. Place loaf pans on baking sheet. Cover pans with waxed paper. Let loaves rise at room temperature until dough almost fills pans, about 2 hours.
Preheat oven to 400°F. Gently brush top of loaves with egg glaze. Bake until loaves are golden brown and sound hollow when tapped, about 30 minutes. Cool in pans on racks 15 minutes.
Turn loaves out onto racks; cool at least 1 hour. (Can be made ahead. Cool completely. Wrap loaves in foil; place in resealable plastic bags and store at room temperature 1 day or freeze up to 1 month. Rewarm room-temperature or thawed loaves wrapped in foil in 350°F oven about 15 minutes, if desired.)

Tuesday, December 23, 2008

Challah, anybody?


This past weekend I made a whole lot of challah. Well, 5 loaves to be exact. Which in my book was quite a bit, especially since a. I'm not Jewish and b. I've never made, seen, or tasted challah before.

The challah adventure began because I was planning to visit friends on Sunday who just had a new baby and I wanted to bring some sort of baked good (shocker!). Last year there was this braided apple something that was in an issue of Gourmet that I had really wanted to make but never got around to it. And since I didn't save the magazine, I had no clue what it was. Googling "braided apple" didn't bring me any close to finding it, but it did bring up recipes for challah. That was it! I would make an apple challah.

So the hunt for a good challah recipe was on. I love it when I search like this because I always end up discovering great new blogs, and this weekend I came upon Baking and Books. Ari seems to know her stuff when it comes to challah (or I assume so, again, I'm no challah expert).

Her Apple Honey Challah was exactly what I was looking for and I only modified it slightly - after I brushed the loaves with egg and olive oil wash, I sprinkled the top with granulated sugar for extra sweetness. The quantity of dough was perfect for making one large loaf or two medium-sized loaves and is just amazing fresh out of the oven!

As we gave the loaves of challah to our Jewish friends, it was a hit. Everyone seemed to appreciate the homemade challah, and after making the dough over and over again, I believe I have it memorized now. You know, handy for those times I'm challenged to a challah bake off.

Apple Honey Challah
1/2 tablespoon active dry yeast
4 tablespoons granulated sugar
1 teaspoon salt
1/2 tsp cinnamon
1/8 tsp freshly grated nutmeg
4 1/4 to 4 1/2 cups all-purpose flour
1 cup of warm milk (whole is best, low-fat is ok too)
2 eggs + 1 for the glaze
4 tablespoons of olive oil + 1 teaspoon for greasing the bowl and another for the glaze
3/4 tablespoon dark wildflower honey
1/2 cup diced organic dry apples

In a large bowl using a whisk combine the yeast, sugar, salt, cinnamon, nutmeg and 1 cup of the flour. Add the warm milk, 2 eggs, 4 tablespoons of olive oil, then the honey. (Add the olive oil first, then use the same measuring spoon to add the honey - residual oil on the spoon will make the honey slide right out.)
Vigorously mix the ingredients until smooth, scraping the sides of the bowl halfway through, about 3 minutes. Add the remaining flour 1/2 cup at a time, alternating with the apples, which should be added in handfuls. Switch to a wooden spoon when the dough becomes too thick for the whisk. Continue mixing the dough until it is too stiff to stir.
Turn the dough out onto a lightly floured surface and knead until soft and springy, about 4 minutes. If the dough is sticky, dust with flour 1 tablespoon at a time - just enough to prevent it from sticking to the surface. The dough is done when it’s smooth and small air bubbles show under the skin. If you press your thumb into it the impression should bounce back. This is a slightly firm dough, which is exactly what you want for easy braiding later on.
Place the dough in a deep container greased with 1 tsp of olive oil. Turn the dough once to coat the top and cover with plastic wrap. Allow it to rise at room temperature until doubled in bulk, about 1 1/2 to 2 hours.
Line a baking sheet with parchment paper or lightly grease it with non-stick spray. Gently deflate the dough by pressing your fingers into it, then turn it out onto a lightly floured surface.
Check out Baking and Books for the different ways to braid your loaf (I opted for the classic braid and also the pinwheel.)
Preheat your oven to 350 degrees F and place the braided dough on your baking sheet, cover loosely with plastic wrap and let rise until almost doubled in bulk, 30 to 40 minutes. If you are using a loaf pan, likewise loosely cover your dough with plastic wrap and let rise until almost doubled in bulk, 30 to 40 minutes.
Just before the rising time has finished whisk together 1 egg and 1 teaspoon of olive oil, this is going to be the glaze for your bread. Gently brush the dough with a thick layer of it. If you want extra sweetness, sprinkle with granulated sugar.
Place the dough in the oven and bake for 30 to 35 minutes, or until the bread is a deep golden brown and sounds hollow when you thump it on the bottom. If you are using a loaf pan you can test your bread by covering the pan with a clean kitchen towel then, while wearing oven mitts, flipping the pan over so that the bread falls into the towel. Thump the bottom. If it does not sound hollow place the pan back on the bread, flip it over, and put it back in the oven for another 5 minutes or so.
When your bread is done transfer it to a baking rack to cool.

Tuesday, December 9, 2008

Beginning of the Winter Blues


Oh, Chicago, why are you so cold and pummeling us with rain, sleet, snow and ice?! It's all just too much, especially when it happens all within a 24-hour period! To beat the blues over the weekend, Steve and I teamed up for some good old fashioned comfort food.

He threw a whole lot of things into a pot, let it simmer for a couple of hours, and voila! We had chili. And really good chili to boot. I'm not usually a big chili fan (I have faint memories of being "forced" to eat it as a child, but that's not an uncommon experience for such a picky eater), but it really enjoyed what Steve made. It was warm, hearty and just a little bit spicy.

To excentuate the spice of his chili, I decided to make a jalapeno cheddar cornbread. I just love cornbread - the texture, it's ability to be sweet or spicy or even a little of both. Since I decided to pull this together last minute, I had to really work with what I had in the kitchen. With no creamed corn, buttermilk or sour cream at hand, my choice of recipes was limited.

I kept on coming back to Ina Garten's recipe - practically a million hits when you search for "jalapeno cheddar cornbread." I fought this recipe for as long as possible. As great as the Barefoot Contessa might be, she does love her butter! The recipe called for 2 sticks which seemed so excessive...but then I saw the quantity - enough for a 9 x 13-inch pan. Split it in half, and it was the perfect amount to fill my 9-inch round cake pan and with only 1 stick of butter! And...worth EVERY buttery bite! This is, hands down, the best cornbread I've ever had.


One-Pot Chili
Recipe by Steve

Part 1:
1T extra virgin olive oil
2 medium white onions, chopped
1/2 cup carrots, finely chopped
2 jalapeno peppers, seeded and minced
1 chipotle chili in adobo sauce, seeded and minced

Place these ingredients in your pot under very low heat for 5-10 minutes. If the onions start browning, then your heat is too high.

Part 2:
Next, add the following to your pot. The dark chocolate helps give a richness to the chili and counters whatever acidity may be in your tomatoes. The beer helps adds juiciness and a meaty flavor to your protein, which you'll add later. Bring the broth to a simmer, stirring occasionally. Let the mixture simmer for approximately 45 minutes, stirring occasionally.

3 cups chicken stock
2 28oz cans no-salt-added diced tomatoes
1 can tomato sauce
6 T chili powder
1 T brown sugar
1 T cumin
2 oz dark chocolate (60%)
8 oz of a dark beer of your choice
1 teaspoon dried oregano

Part 3:
1.5 pounds of protein of your choice (ground beef, ground turkey, ground bison, venison, etc)
4 15oz cans of beans of your choice (kidney, pinto, or black)
1 T chili powder
Salt
Pepper

Next, brown 1.5 pounds of the protein of your choice. We used 93% lean ground turkey this time, but you can also use lean ground beef, sirloin, bison, venison, or any combination of proteins.Lightly season with salt and pepper. Add the browned protein, along with the beans, the additional chili powder, and salt and pepper to taste. Let this mixture simmer on low heat for approximately 1 hour.

After this 1 hour, let the chili sit for approximately 7-10 minutes to cool slightly and thicken. Enjoy!


Ina Garten's Jalapeno Cheddar Cornbread
Recipe from Food Network

3 cups all-purpose flour
1 cup yellow cornmeal
1/4 cup sugar
2 tablespoons baking powder
2 teaspoons kosher salt
2 cups milk
3 extra-large eggs, lightly beaten
1/2 pound (2 sticks) unsalted butter, melted, plus extra to grease the pan
8 ounces aged extra-sharp Cheddar, grated, divided
1/3 cup chopped scallions, white and green parts, plus extra for garnish, 3 scallions
3 tablespoons seeded and minced fresh jalapeno peppers

Combine the flour, cornmeal, sugar, baking powder, and salt in a large bowl. In a separate bowl, combine the milk, eggs, and butter. With a wooden spoon, stir the wet ingredients into the dry until most of the lumps are dissolved. Don't overmix!
Mix in 2 cups of the grated Cheddar, the scallions and jalapenos, and allow the mixture to sit at room temperature for 20 minutes.
Meanwhile, preheat the oven to 350 degrees F. Grease a 9 by 13 by 2-inch baking pan.Pour the batter into the prepared pan, smooth the top, and sprinkle with the remaining grated Cheddar and extra chopped scallions.
Bake for 30 to 35 minutes, or until a toothpick comes out clean. Cool and cut into large squares. Serve warm or at room temperature.

*Note: I cut the recipe in half to fill a 9-inch round cake pan and also eliminated the scallions because I didn't have any in the kitchen.


Monday, November 17, 2008

Bring on the Orange


I've been getting jealous of all of the great food that people have been posting lately...involving all of the fabulous produce that's in season right now! So this weekend Steve and I finally decided to get with the program and make up some fun fall food, taking advantage of some great veggies.

Steve gets all of the credit for his butternut squash risotto. I was a little bit skeptical of of this stuff only because I'm more of a picky eater and squash isn't the first thing I would grab for dinner. But this was fabulous! I'm so proud of him and how great this turned out, and thank goodness it was good because he made A LOT of it! Steve pulled his recipe off of Simply Recipes. I couldn't tell you anything about the process for making this, but I can vouch for the fabulous taste.

Since I knew Steve was going to be focusing on his butternut squash, I thought I'd make something that "felt fall" to accompany his dish. Also, since it was a first for me with butternut squash, I thought I'd go for another first and work with sweet potatoes, a vegetable I've never really had either. So I found a recipe for sweet potato biscuits.


After hunting around online, I ended up using a Paul Deen recipe. I know what you're thinking, "You must have used a pound of butter, right?" Wrong! Of the many recipes I came across, this actually took the least amount of butter and did not take Bisquick - score! My only complaint is that Paula instructs you to roll out the dough to 1/2-inch thick and claims you'll get 15-18 biscuits. Umm, no. Unless you're making mini biscuits this probably won't work. So I rolled mine out a bit thinner, so they weren't the big fluffy biscuits I would have liked. Next time I'll definitely double the recipe, but otherwise wouldn't change a thing - the taste was fabulous!

I'm so excited that I tried two new vegetables this weekend and loved 'em both! I can't wait to bust out a lot of cranberries and get some yummy pies made!

Sweet Potato Biscuits
1 1/4 C all purpose flour
2 T sugar
4 tsp baking powder
1/2 tsp salt
3/4 C mashed cooked sweet potatoes
1/4 C softened butter
2 to 4 T milk (depending on the moisture of the potatoes)

Preheat the oven to 450 degrees.
Sift together the dry ingredients. In a separate, large bowl, mix the sweet potatoes and butter. Add the dry mixture to the potato mixture and mix to make a soft dough. Add milk a tablespoon at a time and continue to work together. Turn the dough onto a floured board and toss lightly until the outside of the dough looks smooth. Roll the dough out to 1/2-inch thick and cut with a biscuit cutter. Place the biscuits on a greased or lined cookie sheet and coat tops with melted butter. Bake for about 15 minutes. If the biscuits are browning too fast, lower the oven temperature.

Since I don't have a biscuit cutter, I used my scalloped circle cutter from my Wilton 101 piece set. Check out my review of this cookie cutter set on Sazze.com!


Monday, June 16, 2008

When the Farmer's Market Hands You Strawberries...

...make strawberry bread!

Steve and I purchased some excellent strawberries this weekend at the Wicker Park Farmer's Market. Even though we'll end up paying just a little bit more for produce from the farmer's market, we're never disappointed with what we bring home. The asparagus is always fresher and plumper, the berries always bright.

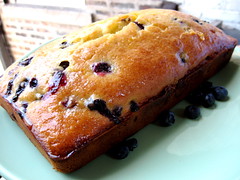
It seems like recently all of the strawberries we've been buying, even from Whole Foods, are really lacking in the taste department. This bunch from the farmer's market packed a lot of punch - great, tart flavors perfect for baking. They really held up well and the great strawberry flavors came right through. If I decided to make this bread again I would definitely taste test my berries beforehand, because if they're lacking in flavor from the get-go, I don't think the bread would be nearly as delicious!

Strawberry Bread
Recipe adapted by LazySusin

2 1/4 cup pastry flour (all-purpose flour may be substituted)
3/4 cup whole wheat flour
3/4 C + 2 T sugar
1/2 teaspoon salt
1/4 teaspoon baking soda
1 tablespoon baking powder
1 - 1 1/4 cups fresh strawberries, chopped
1 large egg
1/3 cup cooking oil
2/3 cup milk
1 cup water
1 teaspoon vanilla extract
1 teaspoon almond extract
Preheat the oven to 350 degrees.

In a large bowl, mix the dry ingredients together (except for the berries).
In a medium bowl, whisk the egg with a fork. Stir in the cooking oil, milk, water, and extracts. Add the berries to the liquid mixture and add that to the dry mixture.
With a spatula, mix the two together until moistened. Do not over mix.
Scrape the batter into a well-greased 9-inch by 5-inch loaf pan. Spread the batter evenly in the pan.
Sprinkle the top of the loaf with granulated sugar, which will create a subtle sugary crust when baked.
Bake for about an hour to an hour and ten minutes or until done. Test for doneness by inserting a toothpick into a crack in the center of the loaf. The toothpick will come out clean when done. Let cool for about 10 minutes before removing from the pan and cooling completely on a wire rack.

Friday, May 30, 2008

Rosemary Flatbread

I was on a carb-a-licious kick over the weekend, which was great because I had taken a long break from making bread. I've been wanting to make a flatbread for awhile, so I'll buy a fresh bunch of rosemary on the weekends....and then it sits in my refrigerator all week. This time, however, I kept myself accountable to my rosemary and actually followed through.

Because I wanted to make the flatbread in time for dinner, and I hadn't planned ahead, I didn't have the opportunity to make a more complex recipe that required starters, multiple rises, etc. So I found a recipe for thyme flatbread online and adapted it to my needs. It wasn't a slam dunk, though. I think I would probably hunt around for a different recipe or further adapt the one I found, but on the upside, I pulled it out of the oven just as Steve finished our shrimp and pasta dinner!

Rosemary Flatbread
Recipe adapted by Lazy Susin

1¼ cups warm water (110 to 115°F.)
1½ tsp granulated sugar
1½ tsp active dry yeast
1½ tsp salt
3½ cups all-purpose flour
1-2 T olive oil
Chopped Rosemary
Kosher Salt

Place water into large bowl. Sprinkle with sugar and yeast. Let stand 5 minutes or until yeast is dissolved. Stir in salt, olive oil and half of chopped rosemary. Gradually add flour, stirring until dough forms.
On a lightly floured surface, knead dough 10 to 12 minutes or until smooth and elastic. Place dough in large oiled bowl, cover; let rise in warm place until doubled in size; about 45 minutes to 1 hour.
Place oven rack in lowest rack position; heat oven to 450°F. Grease a 15x10x1-inch jelly roll pan.
Gently punch down dough to deflate. Place in pan; using palm of hand press dough to cover bottom of the pan. Cover; let rise about 20 minutes or until risen by half. Brush dough with oil; sprinkle generously with coarse salt and other half of chopped rosemary.
Bake 12 to 15 minutes or until light golden brown.

Wednesday, May 28, 2008

Bagels Abound

Steve strongarmed me into making bagels over the weekend...his argument went something to the tune of "my old co-workers got bagels but my new co-workers haven't had any yet." Hmm. Somehow this new job of his is causing some repeat performances in the baking department. I can't say I complained too much, though. There's something completely satisfying when you boil up the bagels and they actually look like...bagels! So perfect, yet so very easy. And it makes me feel kind of like a baking badass. Most people I know would shudder at the thought of spending a day off of work boiling bagels.

Last time I went with Asiago, a personal favorite of mine. This time around I decided to do cinnamon raisin...well, half cinnamon raisin. The other half were, of course, Asiago. Right now we're trying to save money on groceries (ha!), so buying a $10 hunk of Asiago at Whole Foods wasn't a top priority for me, but the end result is too good to resist. Again I used the Nigella Lawson recipe that Confections of a Foodie Bride had adapted, except I eliminated the maple extract and threw in raisins until I was satisfied (just keep on adding until it looks good!) for the cinnamon raisin batch. For the Asiago batch, again, no cinnamon or maple, shredded Asiago on top of the egg wash before baking. The cinnamon raising were amazing.
To keep on top of things when portioning out the dough, I used my handy kitchen scale, weighed the entire ball of dough, and then divided it up from there (each bagel was around 100-110 grams). This is much easier than going by site alone.

Now I just have to work things out so these bagels actually stay with me for enjoyment instead of trotting off with Steve to be devoured at work, and all will be good.

Monday, May 26, 2008

Celebratin' Good Times

This weekend our friends Stacey and Brian hosted a celebratory barbecue for our friend Joe, who recently gradated from UIC. What better way to celebrate Joe's graduation than with Greek Celebration Bread? There are many different versions of this bread from what I've seen, I chose to make the Christopsomos, using raisins and toasted walnuts. The bread was devoured, a good time was had by all at the party, and I was finally able to work from Peter Reinhart's Bread Baker's Apprentice, which Steve gave me for Christmas.

Christopsomos - Greek Celebration Bread
Recipe adapted from the Bread Baker's Apprentice
1 C poolish
1 1/4 C unbleached bread flour
3/4 C water, room temperature
1/8 tsp instant yeast
Dough
3 1/2 unbleached bread flour
1 tsp salt
1 1/2 tsp instant yeast
1 tsp ground cinnamon
1/4 tsp ground nutmeg
1/4 tsp ground allspice
1 tsp orange zest
1 tsp almond extract
2 large eggs, slightly beaten
1/4 C honey
1/4 C olive oil
3/4 C whole or low-fat milk, lukewarm
1/2 C raisings
1/2 C chopped walnuts, lightly toasted
Glaze
2 T water
2 T sugar
2 T honey
1 tsp lemon or orange extract
1 tsp sesame seeds

Combine ingredients for the poolish until it looks like pancake batter. Let it ferment at room temperature for 3-4 hours and then put into fridge for up to 3 days. Make at least 1 day in advance.
Combine flour, salt, yeast, spices in mixing bowl. Add the poolish, extracts/zest, eggs, honey, olive oil and milk. Stir with spoon or on slow speed with mixer using paddle attachment, until forms ball.
Knead teh dough on the counter or use dough hook at medium speed. Use extra milk or flour as needed to form soft ball. Knead for 10 minutes, adding in raisins and walnuts.
Oil a bowl and place dough in, oiling all sides. Cover and let rise for 90 minutes, or until doubles.
Divide the dough into two pieces, one twice the size of the other. Take the smaller piece and place in a plastic bag and put in fridge. With the large piece, form into a boule. Place on parchment-lined baking pan, mist with with olive oil and lightly cover with place wrap. Let rise for 60-90 minutes.
Preheat oven to 350 degrees.
When loaf has doubled in size, take the smaller piece of dough from the fridge and divide into two pieces. Roll each piece into a 10-inch long rope. Cross the two ropes over the top of the boule. Split the ends of each rope and coil them.
Bake for 20 minutes, rotate the pan 180 degrees and then bake for another 20-25 minutes, until the loaf is golden brown and makes a hollow sound.
To make the glaze, combine the water and sugar in a saucepan and bring to a boil. Add the honey and extract, turn off the heat. Immediately glaze the loaf after removing from the oven, sprinkle with sesame seeds.
Cool bread on a wrack for at least an hour before serving.
CELEBRATE!

Monday, March 24, 2008

Banana Bread Monday

Steve has been wanting banana bread (sadly, it's not my favorite treat to make or eat), so I promised him I would help him make some over the weekend to take into work today. We did a little TasteSpotting search to see what kind of banana bread bloggers are making these days, and came across the chocolate marble banana bread from Eating Out Loud and the beautiful banana bread/cake from Rasa Malaysia. We used the wonderful recipe from Eating Out Loud and the great idea of the banana slices on the top of the bread from Rasa Malaysia and we were set!

I love the swirl of the chocolate throughout the loaf and for a non-banana bread eater, it was actually pretty good (chocolate always helps, doesn't it?). The added banana slices on top make it look extra fancy!

Sunday, January 6, 2008

Asiago Cheese Bagels

I've been dying to make bagels for the longest time, but had to wait until I had plenty of time on my hands. However, I learned today that the process wasn't nearly as involved as I'd thought. I mixed up the dough this morning, put it up to rise for an hour while Steve and I went for a run (hooray for 50-degree weather in January!), and came home to roll, boil, and bake my bagels.

There are many different recipes out there for bagels and I think the one I went with is on the easier side of things - Confections of a Foodie Bride had adapted a recipe of Nigella Lawson's for French Toast Bagels. I made a few tweaks to this recipe, opting for savory over sweet. I eliminated the maple extract and the cinnamon and added a 1/4 cup sugar and 1 tsp baking soda to the water I poached the bagels in. I also made sure that I let the bagels dry a bit after boiling them before returning them to the baking sheets.

The final touch was shredded Asiago cheese sprinkled on top after the egg wash, and into the oven they went. The end result? Beautiful golden brown bagels that (in my opinion) could have come straight from a bakery. Toasted and smothered in cream cheese (or butter, my preference) and Steve and I were in heaven - what a great way to spend a Sunday!

Monday, July 9, 2007

Cherry Almond Bread


Cherry Almond Bread
Originally uploaded by Lazy Susin
I must be on a bread kick lately, but it's just so much fun, especially with all of the great fresh and dried fruit I seem to accumulate in my kitchen. At the request to bring some bread to a barbeque, I pulled together a Cherry Almond bread using this great recipe, which is an awesome bases for any fruit and nut bread. I also threw together a couple of loaves of yummy white bread (you can see 'em in the background), which is always a favorite.

Now if only I could get my cakes to look as pretty...

Sunday, July 1, 2007

Blueberry Orange Bread


Blueberry Orange Bread
Originally uploaded by Lazy Susin
I finally got some baking done this weekend ... not what I planned on doing, but still good ... Steve and I had some extra blueberries from the Wicker Park Farmer's Market that needed to be used up, so I whipped up a blueberry orange bread. Steve's going to take it to work tomorrow to share with co-workers, but I'm hoping he'll save me a slice ;)

Thanks to about.com for this great recipe...

INGREDIENTS:

* 2 tablespoons butter
* 1/4 cup boiling water
* 1 tablespoon finely grated orange peel
* 1/2 cup orange juice
* 1 egg
* 1 cup granulated sugar
* 2 cups all-purpose flour
* 1 teaspoon baking powder
* 1/4 teaspoon baking soda
* 1/2 teaspoon salt
* 1 cup fresh or frozen (thawed) blueberries

Topping:

* 1 teaspoon finely grated orange peel
* 2 tablespoons orange juice
* 2 tablespoons honey

PREPARATION:
Combine butter and boiling water in a small bowl; add 1 tablespoon grated orange peel and 1/2 cup orange juice.

In a mixing bowl, beat egg and granulated sugar with an electric hand-held mixer until light and fluffy.

In a separate bowl, combine the flour, baking powder, soda, and salt; add to egg mixture a little at a time, alternating with orange juice mixture, ending with flour mixture.

Fold in blueberries. Spoon batter into a greased and floured 9x5x3-inch loaf pan. Bake at 350° for 50 to 55 minutes, or until a wooden pick or cake tester inserted in center comes out clean.. Cool bread in pan 10 minutes; remove to wire rack.

Combine 1 teaspoon orange rind, 2 tablespoons orange juice, and 2 tablespoons honey, mixing well. Spoon over hot bread; let cool.

Enjoy!